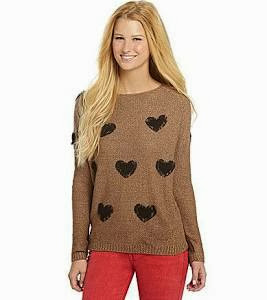
Like the last tutorial, this post was inspired by a product I would love to buy, but can't justify spending the money on. This sweater is fun and exactly my style. Sadly, it's also $69. I don't spend $69 on clothes.
I had seen a picture of a sweater on Pinterest of a sweatshirt with a giant heart on it. There was no tutorial to it, just the image, but I sent my BFF a text, showing her the image and asking if she thought I could do that myself. Since she's an optimistic sort, she immediately said, "yes", and that was all the encouragement I needed!
I had this plain sweater that was in my fabric scrap pile. There really isn't anything wrong with it, other than that it is super old and I'm tired of looking at it.
I had some old sweatpants that I had used as a halloween costume this year, by applying acrylic paint to the sides to make football pants. (Isn't he cute?) The inside of the pants was the same texture as the sweater, and I decided they would make great material for my embellishments.
I cut a square of material out and folded it in half, then cut this shape below.
Once you open them, you get these hearts. I did 3 different sizes.
Next, I played around with the placement and pinned them. (Notice my handy-dandy pin cushion from a previous post.)
Now, remember that I am hand-sewing this, since Santa doesn't come until December 25th, sadly. At first, I tried doing an overcast stitch around the hearts, but then I remembered that I have 2 babies and did not have time for that. Instead, I ran a running stitch through the middle of each.
After, I ran a long running stitch around the perimeter.
And here is how it came out! Again, I am doing this by hand and was in a hurry, since the kids' nap time was nearly at an end. If I had taken more time and had used a stabilizing fabric behind these, this would look much better. I kind of like the not-perfect nature of this, though. It's fun and whimsical, and suits me. It was also free!
Modeling it (poorly as it's just me here and I had to improvise). My posture makes the top heart wrinkle up, but you get the idea.
And here's a fun b&w shot of my baby girl taking a picture with me. She likes writing the blog with me and is in my lap as I type this. I hope you guys liked the tutorial and that your weekend is awesome!


No comments:
Post a Comment