
My son is growing so quickly that it's hard to keep up! I find myself constantly going through his clothes and picking out things he's too tall for, or shirts that are too short. Sometimes, though, I come across shirts that still fit great, but are long-sleeve. I know that I've got 2 options—throw in the donate pile, or convert them into short-sleeve shirts. They definitely won't fit him by winter.
Being a thrifty mom, I decided to convert them. Here's how I did it (if you don't have a sewing machine, look into hemming tape, which you can find in any fabric store):
Friday, May 30, 2014
Tuesday, May 20, 2014
Quick, Thrifty Chicken Tortilla Soup Recipe
I've been extremely busy over the last couple of months, so I squeeze in an entry when I can. Yesterday, I made a very simple, thrifty, and satisfying soup for dinner, so I thought I'd share the recipe; just look at this yummy goodness!

Chicken Tortilla Soup Recipe
Shredded or diced cooked chicken (I had about 3/4 of a pound that I had frozen from a previous meal, but a rotisserie chicken works well for this, also.)
1 can fire roasted tomatoes or Ro-Tel tomatoes
1/2 cup salsa
1 can Charro beans (or any beans you have on-hand)
2 packets taco seasoning or 2 handfuls of your home made taco seasoning
1/2 cup frozen corn kernels
2 cups chicken broth
Sliced corn tortillas or crumbled tortilla chips
Salt and pepper, to taste
Optional Toppings:
Diced avocado
Sour cream
Tomatoes
Pour all ingredients except chicken and sliced tortillas or tortilla chips in soup pot. Bring to a boil and let them simmer for 15 minutes. Add cooked chicken and simmer for 5 minutes. Turn off heat and let sit, 10 minutes. Just before serving, stir in tortilla strips or tortilla chips. Top as desired.
Like any soup, this recipe can be modified as desired; omitting or adding ingredients as you wish, and if you have a family who isn't into chunks of tomato, you could just blend the cans to create a smooth base. This meal was under $10 and serves 6, for a meal that is less than $2 per serving!
Monday, April 7, 2014
Getting Longer Use Out of Baby Clothes
When my youngest son was around 6 months old, he started outgrowing all of his onesies in length. I cloth diaper, so I preferred t-shirts, anyway, and asked my crafty mother-in-law to convert my onesies into t-shirts, by cutting the bottoms and hemming them. This worked great and I got many more months of use out of them.
Wednesday, March 26, 2014
Thrifty Baby Clothes Tips
There are tons of expenses with babies, but clothes can be really low on the list, if you follow a few simple tips. Here are my best ways for cutting costs on baby clothes:
Tuesday, March 18, 2014
Top 5 Thrifty Family Travel Tips
This week's blog post is centered around family vacation travel! We are taking our 3 children on a short trip soon for spring break, and I thought it might be helpful to post a list of things I have done for years to ensure we don't go outside of our budget during trips. It is very possible to take a family vacation, without spending much money at all!
Here are my top 5 tips:
Here are my top 5 tips:
Wednesday, March 12, 2014
Upcycled Shabby Flower Tutorial
It seems that my blogging schedule has changed to once a week, since opening my new shop! I have tried to get to twice a week blogging, but so far, I haven't been able to. I'm just going to go with what I can do and accept that I'm not superwoman, so if you are still following along on my blog, I love you!
Now, on to this week's post!
A Facebook page friend asked me if I had a tutorial for my shabby flower that I sewed on baby girl's sweatshirt (that belonged to my teenage son, and my younger son) to jazz it up. I know that I used one when I sewed this summer, but I can not find one that incorporates both of these techniques, so I decided to create my own. First, the cuteness of this child flower:

Here's how I did it. Cut a small amount of fabric from anything cotton (I used an old dress). Rip the fabric the rest of the way, so that it frays. Any width or length is good, but err on the side of larger, so you can trim it down if you want it smaller or shorter.

Thread a long sewing needle, no knots at the end. Also, yes, my leopard-print leggings are amazing. Be jealous.

Run a basting stitch through the bottom part of the strip, leaving a long strand of thread at the end. Just keep loading up your needle with fabric, it doesn't matter at all how straight or even you get this.

At the end, you'll have an accordion. Pull your needle through and make sure you have 2 long tails of thread on either end.

You'll have something like this:

Now, pull each side, shaping your ruffle into a round flower. and tie both pieces of thread together into a knot. Trim.

You'll have an overlapping flap. If you are making a hair bow or anything that won't be washed, you can simply run a line of hot glue across this to seal. You could also use washable fabric glue. I sewed it closed, though.


And you have your flower! You can trim up the outside if it's too large, or even run another basting stitch higher up to gather it even more if you want it even more "ruffly".
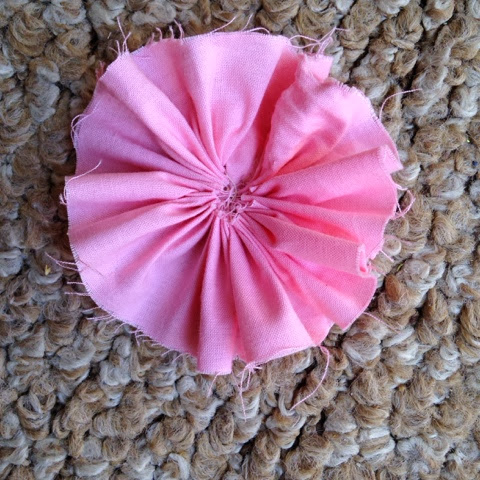
At this point you could call it done, or put a cute button in the center like this:

If you want to finish it the way I did the corsage flower in the sweatshirt, you'll need that second strip of fabric. Tie a knot into the end.

Fold the strip in half, length-wise.

Using your knot as your beginning point, roll the clean edge of fabric around it, turning the fabric under a bit with each turn. If you are going to wash this, you need to have your needle ready to begin adding a stitch every couple of turns to keep it together, or try fabric glue. If this will be a a hair piece, just use hot glue at every few turns.

Twist and turn around and around.

And around…

And voila! (Random lint piece wanted to come play in this photo, sorry!) I love these little rolled rosettes and actually like them all alone as well.

But add them to the center of your ruffled flower to make it extra special (stitch it or use fabric or hot glue). Trim up the outside as you like.

I like to cup the flower around the rosette and stitch it just along the bottom part of the top edge of the rosette, or hot glue it there, to give it a bit fuller dimension, but it's lovely as-is above.

There you go: shabby chic flowers, good for hair, clothes, embellishing bags, tea towels, as brooches, oh, the list goes on!
Wednesday, March 5, 2014
4 More Meatless Monday Ideas
I've got more ideas for Meatless (no red meat or poultry) Mondays! If you tried any from this post, you know how tasty days without meat can be, and the following recipes don't disappoint.
Monday, February 24, 2014
Preemie Prefolds - Thrifty Uses for New Moms
It's been a while since my last post, because I've been really busy, opening my new Etsy shop. I have been so lucky to receive orders, and had a particularly large one last week. With 2 babies, a teenager, husband, and house to take care of, sometimes I will have to prioritize. The blog may be a bit slow until I get into the groove of my new venture!
With that said, today's post is all about new moms. When I had my son, I decided to cloth diaper, and am still doing so, with my baby girl added to the mix. I came across a great deal in my diapering research: preemie prefolds from here for $12 for a dozen, and free shipping! While at first, I used them as newborn diapers (more on that below) there are other uses for these wonderful cloths if you are a new mom--and even a couple if you aren't!
First, if you've never seen one, here is what they look like after 2.5 years if washing:


They become about 10 inches long by 7.5 inches wide. They are soft, quilty, all cotton, and very absorbent. Do note that they only reach max absorbency after about 6 washes. I always threw them in with my towels for a few washes, then used them, though, so just know that they get better with time.
On to the uses!
1) Newborn diapers or boosters in disposable diapers
Yes, people do still cloth diaper! While you can certainly use these in the old-school way, with pins, I liked them tri-folded (simply keep the middle section viewable and fold under each of the thinner outer sections) into newborn diaper covers. These tiny diaper covers were my favorite and they are $4.99 each. You need about 6 a day in the newborn stage and at least a dozen prefolds a day for tri-folding and laying into the cover. I may do a more detailed post on cloth diapering later, but for now, googling cloth diapering will give you plenty of reading material. You could cloth diaper a newborn for under $100 total, though, which may seem like a lot...if you've never bought disposable diapers! If cloth is not your thing, you can still get use out of these in disposables by tri-folding them inside as a booster for older babies who leak through them. Wash them as you would any heavily soiled laundry, and with towels—hot water, plenty of soap, and an extra rinse.
2) Breast Pads
This is hands-down my favorite use. If you are breastfeeding, these will work very well for you. Simply tri-fold the prefold, place inside nursing tank or bra, and you are set! These are cheap, easy, and very absorbent.
3) Diaper Changing Mats and Burp Cloths
This is not new, but deserved a mention. These make great little changing mats when you need one and are ideal for wiping up drool.
4) Large Baby Wipes
These are so great for large messes. Fold in half, add some water and keep handy for big diaper messes. Nothing will clean as well as these!
5) Potty-Training Booster Pads
When baby potty trains, tri-fold these and place them inside undies for dribble protection. If you are handy with a sewing machine, you could even sew them inside underwear.
6) Cloth Napkins and Bath Wash Cloths
If you're not a new mom, you may be interested in these as cloth napkins or bath wash towels. They handle bleach very well, and are very absorbent. Great way to save money in the kitchen and bathroom.
7) Cleaning Rags
Once you've finished with these, and have no more use for them, these make the very best cleaning rags! Car, home, wherever, they are wonderful.
I hope this helps out a new mom! For $12, you have wonderfully absorbent, great quality cloths that will serve you for years to come!
Friday, February 14, 2014
Quick, No-Sew Valentine's Headband
Valentine's Day is upon us and my babies are ready, with a couple of outfits that didn't cost a thing to make. I upcycled a plain shirt for my son here and used this wonderful tutorial to make my daughter a beautiful bubble dress. From a onesie that was too short and an old maternity dress...
Wednesday, February 12, 2014
Valentine's Day Refashion - Boy's (or Girl's) Shirt!
It's almost Valentine's Day, friends, and I realized that I didn't have any Valentine's Day attire for my littles! What I do have though, are t-shirts and fabric, and a nifty new sewing machine, so I got to work on a no-cost "refashion"! This one is meant for my son, but it is completely unisex. Of course, I think anything is, but that's personal preference.
Monday, February 10, 2014
5 Meatless Monday Recipe Ideas
While I don't always do it on Mondays, I do try to incorporate at least one day of a meatless (chicken, beef, and pork) dinner into the week. Not only is it good for you, it's usually a great way to cut your grocery bill. My guys are big-time carnivores, though, so I had to think of meals that they would eat without really noticing the lack of meat. These 5 ideas are winners in my house! (Sorry for the lack of pictures for the first 2 ideas; I need to be better about taking pictures of my food!)
Thursday, February 6, 2014
Make a Valentine's Day Gift for Pennies!
Valentine's Day is approaching and if you like giving sweet gifts to any of the young girls (or even adults) in your life, this post is for you! It takes a few minutes, requires no sewing, and costs mere cents!
Tuesday, February 4, 2014
Thrifty Recipe: Homemade Taco Seasoning
We have Mexican food often in our home, and I really prefer to make my own taco seasoning, rather than buying the oddly-colored, chalky stuff that comes in the packets. Don't misunderstand; I am not above buying them if I am just tapped-out, but if I can avoid it, I do. One way to avoid giving in to the packaged stuff is to make a large batch to have on hand. Here is how I do it:
Monday, February 3, 2014
Easy Upcycle: Baby-Led Weaning Helper
Our little girl is 7 months old, and we were a bit late on solids—just started them a couple of weeks ago. We tend to have a relaxed approach to solids—we mix feeding purées with baby-led weaning (BLW), heavier on the latter approach. A more detailed explanation of BLW can be found here but it's just allowing baby to eat what you eat. They gum down banana, chomp small bites of fish, eat small bits of pasta, all under careful supervision, of course. It worked well for our youngest son (I didn't know about it with my oldest), and has been going great with our daughter.
Friday, January 31, 2014
Upcycled Embroidery Hoop Earring Holder
If you guys follow my Facebook page or Instagram feed, you know how much I love hand-embroidery. I love hand-stitching each piece and have even started to sell some of them. (I absolutely love when someone buys my hoops, but shhh, don't tell, I am not heartbroken if a piece doesn't sell—I'm beginning a hoop art gallery and up it will go!) This hobby means that I have a lot of hoops. As I was experimenting with sequins and beading on a hoop, I had an idea on a completely different way to use an embroidery hoop—as an earring holder.
Thursday, January 30, 2014
5 No-Sew Inexpensive, Easy DIY Gifts
Since a big part of my blog concerns ways to save money, I thought that tackling one of the biggest potential budget-hits—gifts—would be helpful. If you're like us, you have a lot of birthdays that fall in the same few months, and that gets expensive.
To combat this, I give myself a gift budget and I stick to it. I've also found that a great way to cut costs on gifts is to purchase a $10 ITunes or Starbucks gift card and make a gift. Package them together in pretty paper, and you have a useful and thoughtful (doesn't get more personal than handmade) gift that will not break the bank. If funds are super-tight, many of these would be just fine as stand-alone gifts, too. This list if for the girls in your life, but I will do a post for boys soon, as well.
Tuesday, January 28, 2014
Making Boot Socks Out of an Old Sweater
Last week, I upcycled a sweater that was too tight into a soft infinity scarf. It was a no-brainer that I could upcycle the sleeves, but I wasn't sure if I wanted to do a hat or boot socks for me, or even leggings for my daughter. I finally decided to go with the boot socks.
Monday, January 27, 2014
Upcycling a Glass Jar for Storage Using Fabric Scraps
If you haven't noticed, I'm really into upcycling my glass jars and cans into storage solutions. I did a simple five-minute up cycle here and even made my own button fabric here to reuse an old can. However, I do still love those pretty, stylish store-bought holders. The one I really liked at a fabric store in leopard print was $12, and I just couldn't spend that on a jar. With some fleece scraps and a marinara jar, though, I made a storage solution that I like as much as the one I was eyeing at the store.
Friday, January 24, 2014
Desperation 7-Day Meal Plan Under $50
I am new to the more crafty aspects of the blog, but consider myself an expert at thrifty cooking and meal-planning. It's simply a way of life for us, since you have to learn better budgeting when living on one income.
Thursday, January 23, 2014
Upcycling a Too-Small Sweater into an Infinity Scarf
Most of us have it: that beautiful sweater that we washed incorrectly and is now too small, or the one that's simply too small, but we're holding on to it, remembering the days we used to fit into it. (Nostalgic sigh.)
Wednesday, January 22, 2014
Name Hoop Art--Cameron
Like my hoop art? Purchase it here.
The final hoop in my childrens' name and birth date series was my oldest son's. His was very challenging, because nothing babyish would do. He's a Teenager, with a capital "T", so I had to come up with something that wouldn't make him roll his eyes, haha!
The final hoop in my childrens' name and birth date series was my oldest son's. His was very challenging, because nothing babyish would do. He's a Teenager, with a capital "T", so I had to come up with something that wouldn't make him roll his eyes, haha!
Each of my hoops represents my kids as I see them now: Eve's is soft, dreamy, and calming, using lavenders and purples. Madden's is bright and bold, using primary colors and thick lines. So Cameron's could never be anything but gaming-related, since as soon as my mom bought him a Game Boy Advance at 5 years old, that's been his love.
Tuesday, January 21, 2014
Thrifty Recipe: "Secret Ingredient" Scrambled Eggs
When my best friend told me I should do a post with my scrambled egg recipe, I thought there wouldn't be much to it, but when I thought about it, there really is a technique I use for making scrambled eggs. Also, I add an ingredient that I have discovered not many people know about, and it makes the eggs. It's very thrifty to have breakfast for dinner, and these eggs are often on the menu for us. This carton was on sale for $1, so if I had added some pancakes with it, we could have had dinner for about 50 cents a person. That's my kind of budget!
Monday, January 20, 2014
Upcycled Valentine's Day Door Hanger
I never thought I would upcycle an upcycled project, but that is exactly what I did to create an adorable Valentine's day door hanger.
You guys may remember the fun I had with a wire hanger and cut up strips of t-shirts. I made this Halloween wreath this way, and this candy cane door hanger.
Friday, January 17, 2014
Using Your Existing Crib as a Co-Sleeper for Baby
When I was pregnant with my youngest son, we were living in a 2-bedroom home and space was at a premium. With that in mind, I bought a mini-crib and we set his crib up in a small alcove my husband built in our oldest son's room. I figured he'd sleep in a bassinet in our room until he was sleeping through the night, then we'd move him to his crib.
Thursday, January 16, 2014
Name Hoop Art--Madden
Like my hoop art? Purchase it here.
Last week, I completed an embroidery hoop for my daughter. It was stitched on a cream-colored background and was done in purples and grays. I really like the romantic, dreamy feel of it. Eve is a calm, happy baby, and the mellow hoop suits her.
Last week, I completed an embroidery hoop for my daughter. It was stitched on a cream-colored background and was done in purples and grays. I really like the romantic, dreamy feel of it. Eve is a calm, happy baby, and the mellow hoop suits her.
Wednesday, January 15, 2014
5 Ways to Upcycle Dole Fruit Cups
I really like the convenience of fruit cups, but I do not like the waste the plastic little bowls make, so I reuse them as much as possible. After you finish them, wash well in hot, soapy water, of course. Also, I have washed them on the top rack of my dishwasher with no problem!
Tuesday, January 14, 2014
(CLOSED) 50th Post Giveaway!!
NOTE: THIS POST IS NOW CLOSED. CONGRATULATIONS, BRANDY!!
I am going to run a giveaway on my Facebook page, in honor of my 50th post!


I am going to run a giveaway on my Facebook page, in honor of my 50th post!
I am hovering at 77 likes on my Facebook page and I would love to get to 100. When I do, I will draw a name and the winner can choose between one of these handmade projects I've created:

The card wallet has minor sewing imperfections but works great, and the embroidery pendant is a design I came up with last night. I will give the winner a choice of silver tone chain or long, coordinating embroidery floss as a chain if they choose the pendant. If you're a guy, either would make a great gift for your significant other, mother, sister, or any female in your life. Or, if you're feeling sassy, feel free to keep it for yourself! :)
The conditions for the sweepstakes are simple:
1.) Like my page
2.) Like my giveaway post
3.) Share my page (or any post on my page) and comment in my giveaway post that you shared.
Once I reach 100 likes on my page, I will draw a name and you will get to choose between either the card wallet or the pendant as your gift! More pictures for incentive:

If you've shared my page in the last week, feel free to just like and comment on the giveaway post. But, if you want to share my page 2-3 (or more) times in the week, you'll get 2-3 entries in the sweepstakes—the more times you share, the more chances to win! If you have a personal and a fan page on Facebook and want to share on both, that's 2 entries, also.
Once I get to 100 likes, I will draw a winner. If you are a reader but do not have Facebook, I will be doing a Blogspot-related giveaway at 100 posts on the blog, so don't think I've forgotten you!
Good luck to everyone and thank you guys so much for your support!
Good luck to everyone and thank you guys so much for your support!
Monday, January 13, 2014
Cook Once, Eat Twice: Two Crockpot Beef Recipes
This is my 49th post, guys!! I am so excited that I've been able to post this much with 2 babies to care for, but it's been so fun, sharing my tips and projects with all of you! Thank you for reading my little blog; it means a lot to me!
On to the post...
On to the post...
Saturday, January 11, 2014
Name Hoop Art--Eve
Like my hoop art? Purchase it here.
I spent a few hours on this piece last night after the babies went to bed. It's made up of some lovely wool felt I got in yesterday.


I spent a few hours on this piece last night after the babies went to bed. It's made up of some lovely wool felt I got in yesterday.
Look at this rainbow of softness:

And a scrap from my 20 cent scrap bundle I scored:

I used dark gray, silver, and 2 shades of purple for my embroidery floss colors.
I plan to do one for each of my children, but I started with my daughter, because her name is shortest, haha!
I am pleased with the result and can't wait to have all 3 of them hanging up!
Friday, January 10, 2014
Felt Disney Princess Clip Tutorial
For Christmas, I made my niece a hair (or shoe or purse or anything) clip set. It had 2 of the Disney princesses and I had a fun time making them.
Thursday, January 9, 2014
5 Minute Can Upcycle
This is a quick post, and a no-brainer for some, but I thought it was neat to show how quickly you can give something a new look, and a new life. This is totally frivolous and unnecessary, but it really does clean up an eye-sore in my sewing area, and it just looks better! This principle could be used for more than sewing—this could go in a home-office to hold stamps, pens, clips, scrap booking supplies, a baby room to hold pacifiers and other small baby things, or a kids room to hold Legos, small cars or even hair supplies. It would make a cute change bank for loose change, also. Really, the possibilities are endless.
Tuesday, January 7, 2014
Turning Baby Boy Clothes into Baby Girl Clothes
My son and daughter are only 22 months apart in age, and as a result, I have a ton of really nice baby clothes that many would call "boyish". I tend to think anything is gender neutral (sports themes, vehicles, etc.), but many don't, and prefer more traditional colors or graphics for girls. With that in mind, I wanted to show how you can easily turn a plain, "boyish" shirt into a fun, modern "girly" shirt.
Sunday, January 5, 2014
Thrifty Recipe: Chicken Noodle Soup
I haven't posted a thrifty recipe in a while and as I was making up a batch of homemade chicken noodle soup today, I thought it would be a good post.
Friday, January 3, 2014
Fun, Upcycled Button Holder
I'm setting up a sewing/crafting corner and am on the hunt for pretty storage solutions.
This can was just begging to be reused, and when I got a great pack of buttons for Christmas, I knew it could be perfect for them.
Thursday, January 2, 2014
Last Name Hoop Art
Like my hoop art? Purchase it here.
Well, readers, we were hit by a couple of illnesses in our family, and it's been very exhausting, hence the blog-silence. It's a new year, though, and I'm still crafting along, upcycling what I can!
Well, readers, we were hit by a couple of illnesses in our family, and it's been very exhausting, hence the blog-silence. It's a new year, though, and I'm still crafting along, upcycling what I can!
This hoop art is a fun design that I completed over a week ago, but didn't get a chance to blog about. I upcycled a piece of my husband's old dress shirt for this one. I really like how the lines both allowed me to keep the text and design straight, and lend a whimsical notebook-paper look to the piece.
Subscribe to:
Posts (Atom)