
There are tons of expenses with babies, but clothes can be really low on the list, if you follow a few simple tips. Here are my best ways for cutting costs on baby clothes:
Wednesday, March 26, 2014

Tuesday, March 18, 2014
Top 5 Thrifty Family Travel Tips
This week's blog post is centered around family vacation travel! We are taking our 3 children on a short trip soon for spring break, and I thought it might be helpful to post a list of things I have done for years to ensure we don't go outside of our budget during trips. It is very possible to take a family vacation, without spending much money at all!
Here are my top 5 tips:
Here are my top 5 tips:
Wednesday, March 12, 2014
Upcycled Shabby Flower Tutorial

It seems that my blogging schedule has changed to once a week, since opening my new shop! I have tried to get to twice a week blogging, but so far, I haven't been able to. I'm just going to go with what I can do and accept that I'm not superwoman, so if you are still following along on my blog, I love you!
Now, on to this week's post!
A Facebook page friend asked me if I had a tutorial for my shabby flower that I sewed on baby girl's sweatshirt (that belonged to my teenage son, and my younger son) to jazz it up. I know that I used one when I sewed this summer, but I can not find one that incorporates both of these techniques, so I decided to create my own. First, the cuteness of this child flower:

Here's how I did it. Cut a small amount of fabric from anything cotton (I used an old dress). Rip the fabric the rest of the way, so that it frays. Any width or length is good, but err on the side of larger, so you can trim it down if you want it smaller or shorter.

Thread a long sewing needle, no knots at the end. Also, yes, my leopard-print leggings are amazing. Be jealous.

Run a basting stitch through the bottom part of the strip, leaving a long strand of thread at the end. Just keep loading up your needle with fabric, it doesn't matter at all how straight or even you get this.

At the end, you'll have an accordion. Pull your needle through and make sure you have 2 long tails of thread on either end.

You'll have something like this:

Now, pull each side, shaping your ruffle into a round flower. and tie both pieces of thread together into a knot. Trim.

You'll have an overlapping flap. If you are making a hair bow or anything that won't be washed, you can simply run a line of hot glue across this to seal. You could also use washable fabric glue. I sewed it closed, though.


And you have your flower! You can trim up the outside if it's too large, or even run another basting stitch higher up to gather it even more if you want it even more "ruffly".
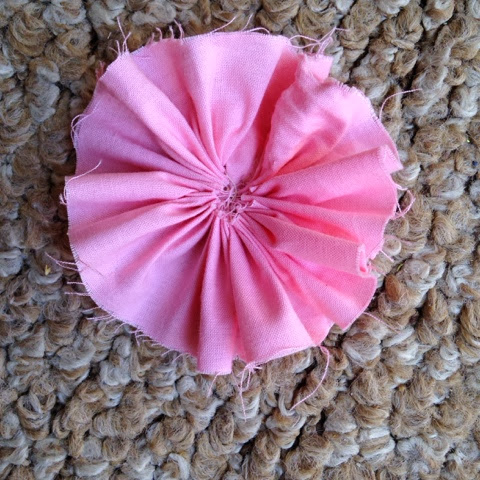
At this point you could call it done, or put a cute button in the center like this:

If you want to finish it the way I did the corsage flower in the sweatshirt, you'll need that second strip of fabric. Tie a knot into the end.

Fold the strip in half, length-wise.

Using your knot as your beginning point, roll the clean edge of fabric around it, turning the fabric under a bit with each turn. If you are going to wash this, you need to have your needle ready to begin adding a stitch every couple of turns to keep it together, or try fabric glue. If this will be a a hair piece, just use hot glue at every few turns.

Twist and turn around and around.

And around…

And voila! (Random lint piece wanted to come play in this photo, sorry!) I love these little rolled rosettes and actually like them all alone as well.

But add them to the center of your ruffled flower to make it extra special (stitch it or use fabric or hot glue). Trim up the outside as you like.

I like to cup the flower around the rosette and stitch it just along the bottom part of the top edge of the rosette, or hot glue it there, to give it a bit fuller dimension, but it's lovely as-is above.

There you go: shabby chic flowers, good for hair, clothes, embellishing bags, tea towels, as brooches, oh, the list goes on!
Wednesday, March 5, 2014
4 More Meatless Monday Ideas
I've got more ideas for Meatless (no red meat or poultry) Mondays! If you tried any from this post, you know how tasty days without meat can be, and the following recipes don't disappoint.
Monday, February 24, 2014
Preemie Prefolds - Thrifty Uses for New Moms
It's been a while since my last post, because I've been really busy, opening my new Etsy shop. I have been so lucky to receive orders, and had a particularly large one last week. With 2 babies, a teenager, husband, and house to take care of, sometimes I will have to prioritize. The blog may be a bit slow until I get into the groove of my new venture!
With that said, today's post is all about new moms. When I had my son, I decided to cloth diaper, and am still doing so, with my baby girl added to the mix. I came across a great deal in my diapering research: preemie prefolds from here for $12 for a dozen, and free shipping! While at first, I used them as newborn diapers (more on that below) there are other uses for these wonderful cloths if you are a new mom--and even a couple if you aren't!
First, if you've never seen one, here is what they look like after 2.5 years if washing:


They become about 10 inches long by 7.5 inches wide. They are soft, quilty, all cotton, and very absorbent. Do note that they only reach max absorbency after about 6 washes. I always threw them in with my towels for a few washes, then used them, though, so just know that they get better with time.
On to the uses!
1) Newborn diapers or boosters in disposable diapers
Yes, people do still cloth diaper! While you can certainly use these in the old-school way, with pins, I liked them tri-folded (simply keep the middle section viewable and fold under each of the thinner outer sections) into newborn diaper covers. These tiny diaper covers were my favorite and they are $4.99 each. You need about 6 a day in the newborn stage and at least a dozen prefolds a day for tri-folding and laying into the cover. I may do a more detailed post on cloth diapering later, but for now, googling cloth diapering will give you plenty of reading material. You could cloth diaper a newborn for under $100 total, though, which may seem like a lot...if you've never bought disposable diapers! If cloth is not your thing, you can still get use out of these in disposables by tri-folding them inside as a booster for older babies who leak through them. Wash them as you would any heavily soiled laundry, and with towels—hot water, plenty of soap, and an extra rinse.
2) Breast Pads
This is hands-down my favorite use. If you are breastfeeding, these will work very well for you. Simply tri-fold the prefold, place inside nursing tank or bra, and you are set! These are cheap, easy, and very absorbent.
3) Diaper Changing Mats and Burp Cloths
This is not new, but deserved a mention. These make great little changing mats when you need one and are ideal for wiping up drool.
4) Large Baby Wipes
These are so great for large messes. Fold in half, add some water and keep handy for big diaper messes. Nothing will clean as well as these!
5) Potty-Training Booster Pads
When baby potty trains, tri-fold these and place them inside undies for dribble protection. If you are handy with a sewing machine, you could even sew them inside underwear.
6) Cloth Napkins and Bath Wash Cloths
If you're not a new mom, you may be interested in these as cloth napkins or bath wash towels. They handle bleach very well, and are very absorbent. Great way to save money in the kitchen and bathroom.
7) Cleaning Rags
Once you've finished with these, and have no more use for them, these make the very best cleaning rags! Car, home, wherever, they are wonderful.
I hope this helps out a new mom! For $12, you have wonderfully absorbent, great quality cloths that will serve you for years to come!
Friday, February 14, 2014
Quick, No-Sew Valentine's Headband
Valentine's Day is upon us and my babies are ready, with a couple of outfits that didn't cost a thing to make. I upcycled a plain shirt for my son here and used this wonderful tutorial to make my daughter a beautiful bubble dress. From a onesie that was too short and an old maternity dress...
Wednesday, February 12, 2014
Valentine's Day Refashion - Boy's (or Girl's) Shirt!
It's almost Valentine's Day, friends, and I realized that I didn't have any Valentine's Day attire for my littles! What I do have though, are t-shirts and fabric, and a nifty new sewing machine, so I got to work on a no-cost "refashion"! This one is meant for my son, but it is completely unisex. Of course, I think anything is, but that's personal preference.
Subscribe to:
Posts (Atom)